Ruins of Krema III
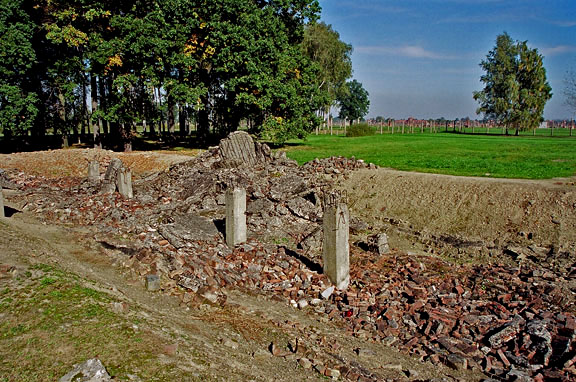
Ruins of the Krema
III gas chamber at Birkenau, Oct. 2005
The ruins of the gas chamber in Krema
III at Auschwitz II, also known as Birkenau, are shown in the
photo above. The gas chamber room was about five feet below ground.
The roof, which was about three feet above ground, was supported
by concrete posts that can be seen in the ruins. The lawn in
the background is the former location of the soccer field at
Birkenau.

The ruins of the undressing
room in Krema III at Auschwitz-Birkenau
The photo above shows the ruins of the
Krema III undressing room for the gas chamber at Auschwitz II.
The gas chamber, which is shown on the left, at right angles
to the undressing room, was below ground but not directly underneath
the brick building which housed the furnace room.
The reinforced concrete roof was six
inches thick, with four holes, in a zig-zag pattern, where the
Zyklon-B gas pellets were poured into the room. These holes were
shown on aerial photos taken by the US military in 1944, but
they cannot be seen today because the entire roof of Krema III
was destroyed when the Nazis blew up the building on January
20, 1945, two days after they had abandoned the camp.
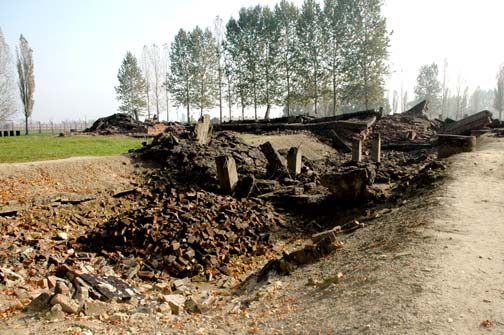 Ruins of underground
gas chamber at Krema III
Ruins of underground
gas chamber at Krema III
According to the book entitled "Auschwitz:
A Doctor's Eyewitness Account" by Dr. Miklos Nyiszli, a
Hungarian Jew who worked at Auschwitz as the chief pathologist
under Dr. Josef Mengele, the three-foot high roofs of the gas
chambers in Krema III and Krema II were covered with dirt and
planted with grass.
On the blueprint of Krema III, the gas
chamber was called Leichenkeller 1 (Corpse Cellar # 1). In the
photo above, one can see the solid concrete columns that once
supported the roof of the gas chamber. When the gas chamber was
in use, it had holes in the roof through which the Zyklon-B gas
pellets were poured into wire columns, which can no longer be
seen today. The holes were closed up by the Germans before they
blew up Krema III and the wire columns were removed, so that
no evidence that this was once a gas chamber can be seen today.
 Display board gives
information to visitors
Display board gives
information to visitors
The photo above shows a display board
at the ruins of Krema III. The photo below is a close-up of the
display board.
The top of the diagram in the photo below
points to the north. Krema III was a mirror image of Krema II,
with its gas chamber pointing to the south.

A - Entrance to undressing room; C -
undressing room; D- underground gas chamber; E - holes on roof
for Zyklon-B pellets; F - five cremation ovens; G - chimney for
the ovens; M - the International Monument built in 1967; K -
gate on the main camp road which goes into the courtyard of Krema
III. The dotted line across the bottom of the diagram denotes
the main camp road. The five cremation furnaces, shown on the
right on the display board, were triple muffle ovens with a total
of 15 doors for shoving three bodies inside, so that 45 corpses
could be burned at the same time. The ovens in Krema II could
also burn 45 corpses at a time.
Krema II was a mirror image of Krema
III with its undressing room parallel to the undressing room
of Krema III. The gas chamber of Krema II was on the south side
of the building, while the gas chamber of Krema III, shown in
the diagram above, was on the north side of the building.
On the right in the foreground of the
photo below is the steps of the International Monument, shown
as M on the diagram. In the center of the picture is an opening
which is what remains of the SS entrance to the anteroom, shown
as H on the diagram. Behind the anteroom where the SS staff entered
the basement is the Vorraum (vestibule) which connected the gas
chamber and the undressing room.
 Ruins of Krema III
with SS entrance into the gas chamber, Oct. 2005
Ruins of Krema III
with SS entrance into the gas chamber, Oct. 2005
The location of the SS entrance, shown
in the center in the photo above, was not on the original blueprints.
Krema III was originally planned to be built at Auschwitz I,
the main camp. The original blueprints for Krema II and Krema
III called for corpse cellars that were completely underground
and included a corpse slide which ended in front of the Leichenkeller
doors, but this slide was never built. The SS entrance was built
instead, but not in the same location as the originally planned
corpse slide.
Krema III was located on the right-hand
side of the east-west main camp road, while Krema II was on the
left side of the road, as you enter the camp. A short road, perpendicular
to the main camp road, connected the two barbed-wire enclosures
of the Krema buildings. Directly opposite the gate into the Krema
III barbed-wire enclosure was an identical gate into the Krema
II enclosure.
The photo below, which is on the display
board at the ruins of Krema III, shows Krema III in the background
on the right hand side of the main camp road; it is enclosed
by a barbed wire fence around the building. In the foreground
are women and children who have been selected for the gas chamber,
walking west down the main camp road. They are looking toward
Krema II which is behind the camera.
 Women and children
walk past Krema III
Women and children
walk past Krema III
The underground gas chamber at Krema
III, shown in the photo above, is directly behind the building,
facing north. Note the railroad tracks in front of the Krema
III building, which brought the victims right up to the gates
into the enclosures of Krema II and Krema III.
The victims in the photo are just moments
away from entering the gate into the barbed wire enclosure around
Krema II or Krema III, where they are destined to die in the
gas chamber. This photo was taken on May 26, 1945 when a transport
of Hungarian Jews arrived at the Birkenau camp.
The prisoners, who had been selected
to work, turned right at an intersection a few feet from Krema
II and Krema III and walked on a north-south road to the shower
room in the Sauna.
 Ruins of undressing
room for Krema III gas chamber, Oct. 2005
Ruins of undressing
room for Krema III gas chamber, Oct. 2005
The photo above shows the undressing
room, which was called Leichenkeller 2 (Corpse Cellar #2) on
the blueprint of the building. The victims entered the undressing
room by descending the stairs shown in the background in the
photo above. Note that the stairs are very short, since the undressing
room was only about five feet underground. To the left in the
photo are the steps of the International Monument which is between
Krema II and Krema III at the western end of the former camp.
The undressing room was only partially
underground since the concrete roof over it was three feet above
ground. The crematory ovens were on the ground floor with the
entrance on the south side of the Krema III building. There was
a typhus epidemic at Auschwitz-Birkenau in the summer of 1943
and the undressing room could have doubled as a morgue in the
event that the bodies piled up faster than they could be burned
in the ovens.
The victims walked down the steps into
the undressing room while an orchestra played classical music.
The location of the orchestra was southeast of Krema III, outside
the barbed wire enclosure and right next to the soccer field.
This was the location where concerts were held for the prisoners
while the gassing operation was in progress. The victims were
told that they were going to take a shower, after which they
would have a nice, hot meal. They took off all their clothing
and then proceeded to the end of the long undressing room where
there was a door into a Vorraum (vestibule).
On the left wall of the vestibule was
a door into the gas chamber, which was located at a right angle
to the undressing room. On the right wall of the vestibule was
a door into another anteroom which had an exterior entrance for
the SS men. On the back wall of the vestibule was a single elevator
which was used to bring the bodies up to the crematory ovens
after the victims had been gassed.
This page was last updated on June 1,
2009
|